BATIK
Batik is a technique for the surface decoration of cloth in which multiple resist
dyeings using wax patterns to block dye is the principal design device. For example,
begin with a piece of white cloth. Apply a design in wax, dip into yellow dye and you
get a piece of yellow cloth with a white design; apply more wax, dip into red dye,
and you get an orange piece of cloth with a white and yellow design; apply another
set of wax patterns, dip into blue dye, and you get a brown piece of cloth with a
white and yellow and orange design on it. Batik designs build backwards and this
takes a little getting used to. The design you draw with the wax is what does not
turn into the next color.
Always begin with your lightest color and work gradually darker. Limiting your colors
to a portion of the color wheel (unlike the crude instance above) gives more graceful
results. Most batik is done this way: two to four colors, waxing out a larger area
each time. There is another method: remove all the wax after each dyeing. Vastly more
trouble and time are involved, but you are less locked into sequence with your
designs. Indonesia is the source for most of the techniques, tools and tones of
modern batik. But it�s an ancient craft, invented many times in many lands. Much work
is being done currently combining batik with other techniques, direct painting,
tie-dye, top dyeing.
SAMPLE WAXING AND DYEING SEQUENCE
|
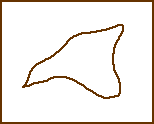
1. Wax area within line
|

2. Dye yellow
|
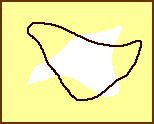
3. Wax area with line
|
|

4. Dye red
|

5. Wax area within line
|

6. Dye blue
|
PREPARING THE FABRIC
Wash the fabric in detergent and hot water to remove finishes and to pre-shrink
fabric. If the cloth isn�t white, boil for a few minutes to remove any prior dye
residues. Dry and iron cloth flat. Test dye a small swatch if there�s any question
about fabric and dye compatibility.
|
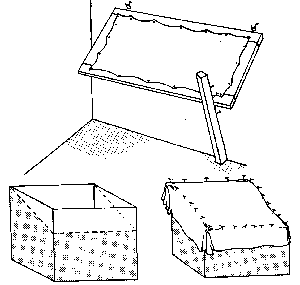
Mount the cloth on a frame to hold it taut and to prevent it from touching
anything while it�s being waxed. Only what�s inside the frame (not touching) is
available for your batik. A clean wood picture frame, or lathing strips nailed
together, or lashed dowels, will serve as a frame. Store-bought canvas
stretcher-frames are firm and square, available in any size, at any art store,
and not too expensive. Or use a cut-down cardboard box. Pin, staple, tie or sew
the cloth to the frame. The cloth must be taken off and refastened each time
you dye, so don�t make your fastening too complex or too difficult to undo, but
get the fabric taut and straight. Working at a slant may be more comfortable;
prop or wedge or fasten your frame accordingly.
|
|
THE WAX
A traditional recipe for batik wax is a mix of beeswax and paraffin, about 60/40.
Beeswax is soft, pliable, and blocks completely: no cracking. Paraffin is more
brittle, and lets dye penetrate wherever cracks form. Crackle is a characteristic
batik effect, a scatter of thin dark wavy lines, a batik hallmark. Some dyers seek
crackle, freezing and crumpling the cloth to make more. Others avoid, if they can,
any effect that seems uncontrolled. For more crackle, more paraffin. Any clean,
low-oil paraffin, melting from 130 - 150° F will work. Beeswax should be light yellow
or tan and clear of debris. But most batik today is done with synthetic
micro-crystalline waxes. They�re more consistent, more often reusable, penetrate
better, can be heated (safely) to higher temperatures. They usually fall between
beeswax and paraffin in price and in working properties. They can be blended with
other waxes for intermediate effects.
The wax must be melted (110 - 190° F), then made entirely liquid and free-flowing (20
- 30° F hotter). Never let wax smoke or boil: it will ignite when it reaches its
flash-point, even without an open flame. Flash-points range from 300° F (low-melt
paraffin) to 500° F (micro-crystalline batik wax). A double-boiler keeps wax melted
safely, the upper chamber can�t get above 212° F (unless the lower chamber runs out
of water). But this is low for batik: most waxes do best from 215 - 275° F. An
electric fry-pan, entirely given over to batik, is ideal - leave the temperature set.
Let the wax solidify between times, cover to keep the dust out; string a wire across
to strip excess wax from brushes, and hold a tjanting handle up.
Wax fires ignite with little warning, burn fast and hot, and have a nasty urge to
spill and spread while burning. The obvious response is wrong. Never put water on a
wax fire. Each droplet of water goes instantly to steam, a 540-fold increase in
volume, an explosion of steam and smoke and - on the rebound - flaming droplets of
wax. Smother a wax fire. A CO2 extinguisher or salt or a towel controls a wax fire
quickly, safely.
Liquid wax demands careful handling. A drop of boiling water stings for a second,
then cools and quits. A drop of hot wax, perhaps a hundred degrees hotter than water
can get, burns and keeps on, and sticks. Wax holds a lot of heat, many calories per
gram. If what gets on you is more than a drop, it can injure or disfigure.
Don�t be frightened, just aware of what�s happening while you work. Be alert, be
effective.
THE FIRST WAXING

|
The idea is to penetrate the cloth, evenly and clear through, wherever you
want not to see the next color. Look at the back of the fabric to check
penetration. Too cool wax clumps on top; too hot wax runs through and smears.
Experience teaches the proper working temperature for each style of
application. You can pencil a design on your fabric or work free-hand. Pencil
lines will wash out if not waxed over: either cover the lines early on, or be
prepared to redraw. A window makes a light-box for transferring designs: tape
your pattern to the glass, hold up the cloth, and trace.
|
A tjanting or wax pen lays down a fine line of wax (saving a fine line of the color
it covers). Brushes cover wider areas, good for thick lines and for filling in
shapes. 1/8 inch, 1/2 inch, 1 inch - makes a good starting set. Sable, camel and ox
bristles are best for waxing. You can cut the bristles for special effects. Use a
paper or thin plastic stencil for repeating details (overly hot wax runs under the
stencil edge). Blocks and stamps, dipped or pressed; wax-saturated pipe cleaners
folded into shapes; cookie cutters; wax-soaked strings - your house is brimming with
wax applicators, once you�ve learned to look.
You can dribble wax from a burning candle (soot and wax dye are possible confusions).
And wax can be applied dry (penetration is not as good): hold a textured object, a
rock, say, under the cloth and rub a block of wax against it from above the cloth.
Don�t tear the cloth.
Most batik workers find tjantings and brushes and stencils are the most satisfactory
tools for general purposes. But for special effects, the rule is: give it a try.
DYEING & RE-WAXING
Any good cold-water fabric dye can be used for batik. It must take on the cloth
you�re using and not corrode wax too quickly. Procion MX dyes, Deka Series L,
Cibacron F; there are many possibilities. Our focus here is chiefly on Procion MX
dyes, and there are tricks to using other dye types that we�ve not covered.
To minimize crumpling, use a flat wide pan to hold your dye-bath. Add the soda just
before putting your work into the bath. The longer it�s in the dye-bath, the darker
the color, but the activated solution corrodes the wax. Fifteen minutes is
reasonable. Rinse in clear running water to get rid of excess dye.
Time spent in a soda-activated Procion bath reduces the blocking effectiveness of
wax. You may have to touch up old wax areas as you do your new waxing. You�ll see
where the coating is getting thin.
Let the cloth air dry between waxings - wax won�t penetrate wet cloth. Many dyers do
two or three batik pieces in a session, so that drying time is not wasted time. But
don�t get things more complicated than you can manage.
DE-WAXING
A boil-fast dye, like Procion, is easy to clean up after. Knock off big clumps of wax
by shaking the cloth. Immerse it in boiling water for two or three minutes, rinse in
cold water: the wax beads up and can be shaken off. Repeat the hot�cold cycle if
necessary, using clean, unwaxy water. Wash with any mild soap and hang to dry. With a
dye that isn�t boil-fast, you can remove wax with an electric iron: surround your
batik with several layers of absorbent paper (toweling, bags, not newspaper). Renew
the paper as necessary. Dry-clean to be rid of the last traces.
You can retrieve wax from the pot you boiled your batik in. Let the water cool, lift
off and save the wax skin. The wax can be reused, a dozen or a hundred times: it
looks bad long before it ceases to block dye. Of course wax ironed or dry-cleaned out
cannot retrieved.
Keep wax from your sink drains. Molten wax starts down easily, until it hits the cold
water in the first trap, and then it solidifies. Liquid drain cleaners will
eventually penetrate a wax plug, the nastier of them. Hot or boiling water doesn�t
help, it just moves the problem deeper. There is such a thing as a harmless amount of
wax that goes harmlessly dow, �but don�t push your luck.
TJANTING
A tjanting is a wax pen, designed to write lines of wax (some say "chunting", we say
"jaunting"). Both tool and word come from Indonesia, where batik is a standard form
of fine art and a method for every-day decoration. A Ukrainian kiska draws similar
wax lines on Easter eggs, on a smaller scale.
The traditional tjanting has a copper bowl, with a hole on top (to let wax
in) and one or more tubes inserted through and soldered to the bottom (to let
the wax out). The bowls are tied to a carved bamboo handle. Tjantings made in
the United States are less delicate-looking, but usually sturdier: turned
hardwood handles with sheet brass bowls.
|

|
A serviceable wax-melter can be made from nested tin cans: a one pound coffee-can
outside, ventilated along its length, with a stubby candle at the bottom for a heat
source; and a tuna-can hung on coat-hanger wire at the top to hold wax. If the wax
smokes, it�s too hot: blow out the candle. Keep the tuna can full, it�s more useful
and less likely to over-heat. Or dedicate an electric fry-pan. Keep the tjanting bowl
submerged in molten wax when not in use.
|
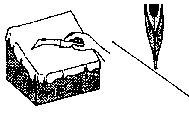
The behind of the fabric must not touch anything when you�re drawing with a
tjanting. Stretch and secure the cloth as you would for any wax application.
A slanted work-surface allows more range for lifting and lowering the handle.
Hold a tjanting like a pen, little finger extended to guide across the
fabric. Keep the tjanting�s tip just touching the cloth, so the wax is drawn
out evenly.
|
To control the rate of flow raise or lower the handle, always keeping the tip
on the cloth. The coordination becomes automatic, after a lot of practice.
Don�t tip so far up or down that wax spills from the fill-hole.
The proof of skill is clean lines with no unwanted blobs, no wavering. Fast
wax flow gives thick lines, slow flow gives thin lines�depending also on how
quickly you�re moving across the cloth. Stops and turns are very often marked
by small knots of wax (eventually of color): like wax crackle they are a
hallmark of batik. Some artists try to avoid knots, some see them as part of
the design.
When the wax cools and wax flow slows and penetration wanes (check the back
of the fabric), dump the bowl and refill. If necessary to unplug the tip,
submerge the bowl for a minute. A wire or broom straw can help clear a stuck
wax plug, but don�t probe when the wax is cold: you can snap off the tip or
weaken the solder joint. And never hold a tjanting over direct flame: it
weakens the joint and could ignite the wax.
The best way to clean your tjantings is not to try. Pour out the bulk of the
wax and store where dust is not. The residual wax will melt next time.
|

|
|


