GUILD
33 Haywood Street
Asheville NC
28801
technical help: 828-255-7818
for orders: 1-800-327-8448
fax: 828-255-8593
e-mail us at
inform@earthguild.com
List of
Instructions
Catalog
(shopping cart enabled)
Earth Guild Home
Supplies: Cards, Books, Shuttles
Recommended Yarns: Maysville 8/4 Warp, Dragon Tale 4/2THE CARDWEAVING RIFF
INTRODUCTION
Don’t be put off by the length of this riff. Card-weaving’s really a reasonably simple process. And if we were with you we could soon show you how to do it. However, since we can’t be there with you, we’ve written out this detailed set of instructions.
Read it through once, to get a general idea. Then read it again while following the instructions. We’ve tried to make it clear. Good luck and happy weaving.
Card-weaving is one of the oldest and most versatile textile techniques. Its history can be traced back 6000 years to ancient Egypt. Traces have also been found throughout Europe, India, and the Middle East.The materials are simple. Cards of heavy cardboard (or similar sturdy material) with a hole punched in each corner. We’ve chosen square cards, but 3, 5 or 6-sided ones have also been used. One warp thread (vertical thread) is threaded through each hole. When threading is completed, the warp is stretched between two fixed points such as two trees, a hook and chair, a hook and you. The weaver rotates the cards. This forces the warp threads on each card to twist around each other. The weaver then inserts the weft thread (horizontal thread), which pins this twist into place. As this process is repeated, a narrow 4-ply band of great strength is formed. Card-woven bands can be used for belts, straps, headbands, or camel harnesses.
LIST OF MATERIALSWarp & Weft: The thread you use for the warp must be smooth and strong; otherwise, it will fray and break (usually in the most inconvenient place possible). For weft, you will usually (but not always) use the same thread, in the color your outside cards are threaded with. You will need three colors for the pattern shown here: light blue, forest green and dark blue. (These are the colors specified in these directions, but you certainly can substitute any three contrasting colors.)
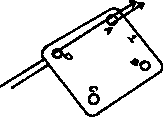
Cards: You will need 19 cards for the pattern given here. You can buy them or make them. If you make them, we recommend 3 to 3-½" square cards with rounded corners. Punch round holes (3/8" diameter) in each corner of each card, far enough in from the edges so that the cards won’t rip open -- about ½" is good. Make sure that the holes line up exactly when the cards are stacked. Label each as in the illustration. Use a ball point pen or other permanent marker when printing the letters. Whether you buy your cards or make them, number them (starting at 1), in pencil. Most people number the cards between the letters A and B.
String and scissors: Plied cotton string (or any strong string which won’t fray), about 3 yards, will do. The non-slippery kind some people use for tying up packages is good. And a small pair of sharp scissors.
Sticks: You will need a piece of dowel, broomstick or straight branch about 1" in diameter. It can be anywhere from 10 to 20" long. Also two smaller sticks, about the size and shape of chopsticks.
Two heavy-duty rubber bands large enough to go around the stack of cards. You need two because one always breaks.
Shuttle: A shuttle is a flat piece of wood or strong cardboard with scooped-out ends around which the weft (back-and-forth thread) is wound. If yours is wood, you can try to taper one long side to a “knife edge”. This edge is used to push the weft into place during weaving. If you don’t have a shuttle with a proper edge, you can use a very dull knife as a “shed sword” to perform the same function. A pre-made belt shuttle performs both functions well.
A sturdy comb with widely spaced teeth, for combing tangles out of the warp.THE PATTERN
| 1 | 2 | 3 | 4 | 5 | 6 | 7 | 8 | 9 | 10 | 11 | 12 | 13 | 14 | 15 | 16 | 17 | 18 | 19 |
| D | D | D | D | D | D | D | D | D | G | D | D | D | D | D | D | D | D | D |
| D | G | L | D | D | D | D | D | G | L | G | D | D | D | D | D | L | G | D |
| D | G | L | D | D | D | D | G | L | L | L | G | D | D | D | D | L | G | D |
| D | D | D | D | D | D | G | L | L | G | L | L | G | D | D | D | D | D | D |
KEY D is dark blue, G is green, L is light blue
PREPARING TO WEAVE
The directions in this riff are for the pattern above. Learning to understand this one will help you to work with others, and soon, invent your own.
A pattern tells you how to arrange the threads in the cards, and what the finished band will look like. For simplicity’s sake, we will use the color names given in the pattern key throughout these instructions, but any three contrasting colors will work.
The first thing to do is to color the pattern in. This makes it easier to read. Use a crayon in each of the three colors to fill in the appropriate blocks. You should now see a triangle in the middle of the pattern. To see what one whole pattern repeat will look like, take a small hand mirror and hold it up at the base of the triangle. Look at the pattern and its mirror image. The two triangles form a diamond. This is what your card-weaving will look like.
Use this color-and-mirror technique before setting up a weaving, to see if you will like it. It saves a lot of time and helps you spot mistakes in the pattern.
Now look at the pattern again. On the left side, you will see letters which correspond to the lettered holes on the cards. On the bottom you will see numbers which correspond to the numbers on your cards. Since the numbers run from 1 through 19, you’ll need 19 cards for this pattern.
Now look at column one. All the blocks in column one are dark blue. Thus, your number one card will have a dark blue thread in holes A, B, C and D. In column two, blocks A and D will have dark blue, blocks B and C have green. So, your number two card will have dark blue in holes A and D and green in holes B and C. This is how you will “read” the pattern draft all the way across.MEASURING OFF THE WARP
In general, you will figure out how long you want your belt or band to be and add 18–24" for knots and weaving waste (18" if you’re using fine yarns, 24" if the yarn is heavy). Thus, a two foot long band would mean 24" + 18" = 42" of warp. Not all of this extra length is wasted; you can use as much as you like of it for a long, luxurious fringe.
For this first project, we will be using a one-yard warp, short and easy to handle. Look back at your pattern for a minute. There are 52 dark blue blocks (or threads), 12 green and 12 light blue. Since the edges of the band will be dark blue, we’ll use a matching dark blue weft. The length of the weft is only a few yards unless you’re weaving a really long piece. So, we’ll need slightly more than 52 yards of dark blue cotton altogether, and 12 each of the other two colors.
Always figure out how much warp of each color you’ll need before you buy it. That way you’ll be sure to have enough.
Now, measure out and cut all 76 one yards lengths of warp. You can use a warping board if there is one available. Or two C-clamps clamped to a table, a couple of nails in a board, two chairs back-to-back -- whatever you can devise.THREADING THE CARDS
Thread the other holes in card #1 the same way. Then gather up the four dark blue ends, which should be drawn out about 8" from the top of the card, tie them at the tip with an overhand knot, and carefully place card number one face down on the table. The knot keeps the threads from slipping out if the card is moved by accident.
Look again at your pattern. You can see that card #1 is threaded with four dark blue threads. If you look at the top of the pattern above, you’ll see an arrow pointing up. This means that the card should be threaded up from underneath. Hold card #1 flat, with the face side (printed side) up. Then pass a dark blue warp thread through the A hole, going from the bottom or blank side of the card up, and out the printed side. See the illustration.
Card #2 should be threaded down, with two dark blue and two green threads, according to the pattern. Proceed as before, placing the threaded card face down on card #1. Continue threading. Be careful to put the right color thread in the right hole, according to the pattern. Also be sure to watch the arrows and change the direction of threading when necessary. The direction of threading is important because it will make the warp twists lie in the right direction, thus making the outline of the diamond shape sharp.
When you finish, you will have a pile of nineteen cards lying face down on the table. Check your threading one more time to be sure, and you’re ready to tie on. TIE ON AND PREPARE TO START WEAVING
Don’t pick the cards up yet. First take one of your heavy-duty rubber bands and carefully place it around the cards, so they won’t fall out of sequence when you pick them up. You will need to fish the bundle of warp ends through. Then pick up the short ends, trying to match lengths as much as possible, and tie them all together at the tips in a secure overhand knot-as close to the end as possible.
Now run a length of string about 10" long through the knot, and tie the ends of the string in an overhand knot or a square knot (left over right, then right over left). Loop the string over a doorknob, hook in the wall or tree branch, and let the whole thing hang there while you take a break.
The next step is to use your fingers to gently comb out the long hanging end of the warp. Start at the bottom and work up. Don’t try to get all the tangles out yet.
Then take your comb and repeat the procedure, from the bottom up. Take your time about it and be gentle. When the warp threads are in pretty good order (don’t be a perfectionist as they will never all lie perfectly), comb them again with your fingers to a fairly even tension and knot them together as you did at the other end.
Now take the warp off its hook and remove the string from the short end (where the cards are). Tie the string on to the other end and suspend the warp from it. Test the strength of the tie on by pulling firmly on the warp. If it seems not to come loose from the hook, then you should be all set. You are ready to begin weaving.
Some weavers prefer to work the cards down the length of the warp instead of reversing it, working the tangles out as they go. If you try this, be very careful not to let the cards fall out of order -- you must work with the rubber band off, floating on the warp above the deck. Also, for the pattern to work, you’ll have to reverse the up-and-down threading directions. Don’t think too hard about this just at first, but the concept may come in handy later on if you use a pattern from a book. If the pattern doesn’t seem to work, check to see which set-up system the author uses.WEAVING
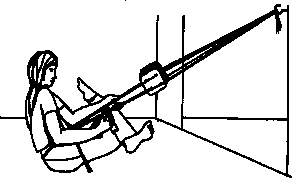
Seat yourself comfortably on the floor or a chair so that the “short” end of the warp, when pulled toward you, is about 6" from your body, and the cards are within easy reach. Cut enough heavy string go loosely around your hips. Pass it around your hips, thread it through the short end of the warp between the cards and the knot. Tie securely -- a good bow knot holds surprisingly well, yet can be undone fast in case the phone rings. You are now tied into the weaving, and simply by moving your body back and forth you can adjust the tension on the warp. Always work with nice, firm tension, or your weaving will be sloppy. From the remaining string, cut off a 10" piece, pick up your shuttle, and look at this illustration.
Notice that the warp threads passing through the holes form two layers of threads between the cards and you. The space between these layers is called a shed. This is where the weft goes when you weave. Notice that the cards are turned on their side in this illustration. They must be on their sides in order for weaving to take place.
Take the rubber band off the cards (lean back a little to keep tension on the warp whenever it is off) and slide it up along the warp towards the hook. Put the 10" piece of string, which will act as a temporary weft, through the shed space so that about 1½" hangs out the right side. The string is used as weft at this point because it will spread the warp threads out to their proper width. You will pull it out later, so it will not be part of the finished project.
Now, with your thumbs on the bottom of the cards, and your fingers on the top, rotate all the cards together forward (away from you) one quarter turn. This means that if holes B and C were on top when you started, holes A and B would now be on top.
(If you didn’t start with holes B and C on top, don’t worry. What matters is that you turned the cards and “changed the shed”.) Be patient while your hand develop a feel for the best way to hold and turn the cards.
Now insert your belt shuttle or knife edge into the shed and beat the weft firmly toward you, pulling evenly with both hands. Insert the long end of the weft into the empty shed from left to right and pull it through, leaving a loop at the selvedge (otherwise known as the edge)
Now insert your belt shuttle or knife edge into the shed and beat the weft firmly toward you, pulling evenly with both hands. Insert the long end of the weft into the empty shed from left to right and pull it through, leaving a loop at the selvedge (otherwise known as the edge). See illustration.
Turn the cards another quarter turn forward again. Before you beat in the weft or insert a new weft, always make sure the shed is clear. Look into the shed, insert a finger and gently push the weft into place. Be sure the shed is clear; each warp thread must be in its right place. Warp tension is important, and patience. Cardweaving is hard to undo, it’s worth getting it right the first time. When you’re sure that the shed is clear, insert the knife (or shuttle) edge and beat the weft firmly back; then tug gently on the weft so that the loop snugs up to the selvedge edge. Insert the weft from right to left and rotate the cards yet another quarter turn forward. The weft must pass through after each time the cards are turned, and should always be beaten firmly. Don’t leave loops at the selvedge (unless you want them for special effects), but don’t pull the weft too tight either.WEAVING (continued)
Continue weaving until the cards have completed one full turn forward. B and C should now be on top again if you started with them there. You are now back at “home position”. Now switch the weft to the real one you will be using. Fill the shuttle comfortably full, and you are ready to go.
Drop the heavy string weft -- just let it go. You will pull it out later. Start off the same way, by placing the new weft through the shed and leaving a short end hanging out. This time, however, turn the cards back (that’s towards you) . When you have made the first quarter turn, beat the weft back, then insert both the next weft shot and the short hanging end into the empty shed. Leave a loop of weft as you did before. Make another quarter turn back (towards you) . This locks the short end into place. Pull the loop close to the selvedge and continue weaving, turning the cards back a quarter turn at a time, until you have completed one full revolution and the cards are back in the “home position”.
Continue weaving for one full repeat, 4 turns forward and 4 turns back. Now look at the woven band. It has a right side and a wrong side. If neither side resembles the diamond on the pattern, don’t worry. If you started out with holes B and C in home position, now try it with holes A and B in home position. If that doesn’t work, there are only two more possibilities: D and A or C and D. Try each one until the diamond appears. You will learn with practice how to find the home position without going through this, but it’s worth it at this point just to see what the weaving will look like with different home positions. It will also give you an glimpse of the myriad of design possibilities.
When you have found the “home” shed that gives you the diamond, continue weaving. Remember to beat firmly and evenly and to keep your selvedges straight by pulling the loops of weft in to the edge. Be careful that one or two cards don’t fall out of sequence, just flip through them once in a while to make sure that all the lettered holes. You can also experiment, turning the cards 6 turns forward and 6 back, or by turning them only forward or only back.
Always put the rubber band back on the cards if you have to move or stop. Otherwise you are courting disaster. While you are working, use your body position to maintain enough tension to keep the cards in place (but not so much you cannot turn them). ?When the weaving has gotten too long to handle comfortably, it’s time to roll it up. This is where the sticks come in. With the rubber band on, untie the cord around your waist and take the knot out of the woven end of the warp. Tie a loop in each end of the cord that goes around your waist so that the big dowel or stick, when passed through these loops, will be a comfortable distance (6-8") from your body.The belt should now be pinned firmly between the sticks and dowel. If the loops are too loose, they must be adjusted until they hold the evrything firmly in place. Now put your waist cord back in place, loop the waist cord loops over the grooves in the dowel and continue weaving. There are many other ways of winding up the warp, but this is one that works.
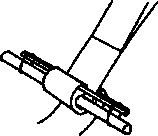
Now take two 5" lengths of the extra cord and make a loop from each one, just large enough to go around all three sticks. There should be very little free play. Slip both loops over the big stick, one at each end. Then pick up the woven end of the warp, and place it over the dowel about 3" from the last weft shot. Wrap the band around the dowel (see illustration) and insert a stick over the double thickness of the band and through the cord loops to pin it in place. It will be loose, so keep holding it. Now fold the band back up over the dowel again and insert the other stick through the loops and over the triple thickness. See illustration.
When you have woven as far as you can (when it’s difficult to get a good shed or turn the cards), untie the knot at the end of the warp and remove the cards. You can finish the ends in a number of ways, such as sewing with a machine, twisting or knotting fringe, weaving the weft back into the woven section, or in a few cases, no finish at all. The last should only be used when you’re sure it won’t unravel (or if you don’t care if it does).NOTES
There are many possible variations in card-weaving. This is just one way — don’t be afraid to adapt it to your own style. Here are some areas for experimentation:
- The cards
You don’t have to stick to 4 hole cards. There are 3, 5, and 6 hole cards, cards with holes in the center, etc. - The materials
Thick warps and wefts are sometimes hard to work with, but can be used if they are smooth and non-fraying. Varying the materials is possible: cotton, linen, hard-twist rug wool, etc. Varying the size of the weft during weaving produces interesting effects. - Patterns
There are hundreds of patterns in circulation, some 50 of which can be found in Robin & Russ’ book, Card or Tablet Weaving. But you can make up your own easily after a little experience. A threading sequence produces very different results with different card-turning sequences. - Other techniques
Try Egyptian double turn or Icelandic double weave. These are written up in Byways in Handweaving, by Mary Meigs Atwater. - Color
Generally speaking, use sharply contrasting colors in your own projects. Otherwise the pattern tends to blend into the background. There are, of course, exceptions to this rule. - Set-up
These instructions use a back-strap set-up. You can use a pair of C-clamps clamped to a table to hold your warp, or even a small loom. -
HAPPY WEAVING


